
Instructions to assemble Snap Panel Walk-in Freezers and Walk-in Coolers
Before you start
The most important step to assure a successful installation is to prepare the walk-in area before starting. The floor of the building where the walk-in is to be installed must be swept clean and be free of any debris. Inspect the building floor for any unevenness as well as any irregularities in the building walls surrounding the walk-in. Unevenness in the floor can cause complications in the installation and may result in the panels not aligning properly or doors not operating correctly.
The walk-in must be placed a minimum of 2” from any adjacent building walls. This space is necessary to allow for proper airflow and to avoid any form of moisture condensation on the walls.
Inspect the entire area surrounding the walk-in to assure that there is proper clearance on all sides (including the ceiling) for any equipment, piping, electrical lines, etc. that will be attached to the outside of the walk-in. Also check for any equipment, piping, electrical lines, lighting, or any other items that may be currently on the building walls and ceiling that may interfere with the necessary clearances for your walk-in.
Familiarize yourself with the panels that make up your walk-in by reviewing the panel lay-out drawing that is included with these instructions. The actual panels will be numbered to correspond with the drawing. Compare the actual panels with the list of panels on the drawing and organize them so as to make your actual installation as smooth as possible. This will also assure that you have received all of your panels correctly.
Before you actually start to install the panels the perimeter outline of the walk-in must be chalked onto the floor of the building. It is extremely important that the corners are drawn square. The squareness can be confirmed by measuring diagonally across the square that has been drawn on the floor. If both diagonal measurements are equal then your corners are square.

Panel installation
Aluminum angles are provided to attach the wall panels securely to the building floor. The angles are installed at the bottom of the panels on the inside and outside the perimeter. Normally these angles are installed section by section as the panels are erected. However, if the walk-in is to be installed adjacent to one or more walls of the building you may not be able to access the outside perimeter after the walls of the walk-in have been erected. In these cases, the angles must be attached to the floor (only on the walls where access is limited) prior to installing the wall panels. The aluminum angles are fastened to the floor using concrete nails or pins (not included). Be sure to check your 2” minimum clearance from the wall. If more than one side of the aluminum angle must be secured prior to starting, be very careful to assure that they are installed at a true right angle on the chalk lines already drawn. A bead of caulking (Acrylic Latex with Silicone -provided with your installation accessories) should be placed along the line where the aluminum angle and the building floor meet on the side where the panel will be installed.
To assemble the wall panels start in a corner at the back of the walk-in ( in the most inaccessible corner). Install your first two lengths of outside perimeter aluminum angle, forming an “L” on the floor following the chalk lines previously drawn. Place a bead of caulking near the floor on the inside edge of the aluminum angle as described above. Select the two wall panels which form the corner. Position the two panels on the floor up against the aluminum angle. Using the lag bolts provided, securely connect the two panels together as shown in figure #1. The number of lag bolts required will vary with the height of the panel. A single bead of caulking is required between the panels before installing the lag bolts. Install the interior and exterior metal trim on the corner seam with sheet metal screws as indicated in figure 1. This will provide for more stability as you continue to install the next wall panels.
Note: it is generally easiest if you apply the caulking to the top of the wall panel before positioning them so you will be ready to install the ceiling panels once the walls are in place.
Continue with the installation of the wall panels in both directions from the corner. This provides for more stability of the wall as the installation progresses. It is very important that the wall panels be assembled with a level topline. If the building floor is uneven, shims may have to be used to accomplish this as you proceed. The last vertical wall panel that you erect should be in a corner. Install the exterior and interior perimeter aluminum angles section by section as the wall panels are erected in order to maximize stability as you continue.
To connect two wall panels together select the next panel in line to be erected. Apply 2 beads of the caulking provided on the female edge of the panels as indicated in figure 2. Gently push the panel to be erected towards the stationary panel already installed. Push until the leading metal edge of the male side has passed into the opening of the adjacent panel as shown in figure 2. It is important to accurately align the panels in this manner from the top to the bottom before asserting any more pressure. When the panel is properly inserted and aligned, top to bottom, then start applying uniform pressure until the two panels snap securely together. On panels 8 ft. or less in height the pressure may be applied by manually pressing on the edge of the panel. For panels greater than 8 ft. in height a forklift or scissor lift is generally required. In this case, a 2” x 6” should be placed vertically on the edge of the panel before gently applying pressure with the lift. (Refer to figure 3)
Continue in this manner with the installation of the wall panels. Each time enough wall panels are installed to support a ceiling panel you will want to install the ceiling panel.
To install the first ceiling panel place a bead of caulking on the top of all wall panels. Lay the ceiling panel on the top of the supporting wall panels, aligning all edges. The ceiling panel is secured by attaching the outside and inside metal trim with sheet metal screws as indicated in figure 4.
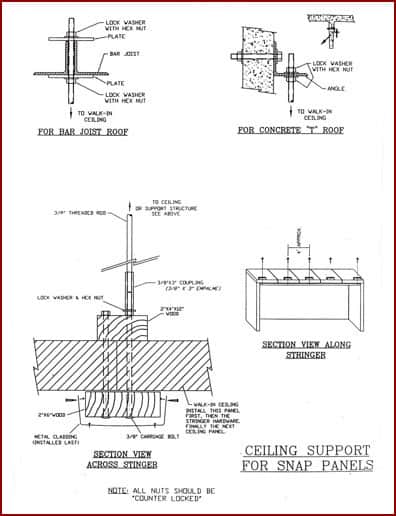
To install the remaining ceiling panels place a bead of caulking on the top of the wall panels. Place 2 beads of caulking on the female side of the ceiling panels as indicated in figure 2. Lay the ceiling panel on the supporting walls, aligning the edges with the wall panels. Using the same technique as described for installing wall panels, the ceiling panel should be gently pushed towards the stationary ceiling panel until the leading metal edge of the male side is partially inserted into the opening of the adjacent panel. When properly aligned and inserted then pressure is applied to gently press the panels together until they snap securely in place. Install the inside and outside metal trim section by section as the ceiling panels are installed in order to hold them securely in place (see figure 4)
Door openings should be cut prior to installing the last panel so that access to the interior of the walk-in is always maintained.
Finishing
Apply the silicone provided to all panel seams to complete the air tight seal.
The walk-in should be left with doors open for 24 hours to allow all fumes from sealants to disperse.
The walk-in may be washed with soap and water. It is best to avoid chlorine or acids of any kind.